


Move your cursor over a shopping category and a mega-menu appears. That familiar behavior is easy for a person, but Selenium cannot reach the hidden links with a normal click() until the menu becomes visible and stable.
That is where a Mouse Hover Action in Selenium comes in. It uses the Actions API to reproduce pointer movement and activate CSS hover states, JavaScript events, or dynamic overlays. Selenium documents moveToElement() as moving the pointer to the target’s middle and scrolling it into view when needed.
Why Mouse Hover Action in Selenium Matters in Real Projects
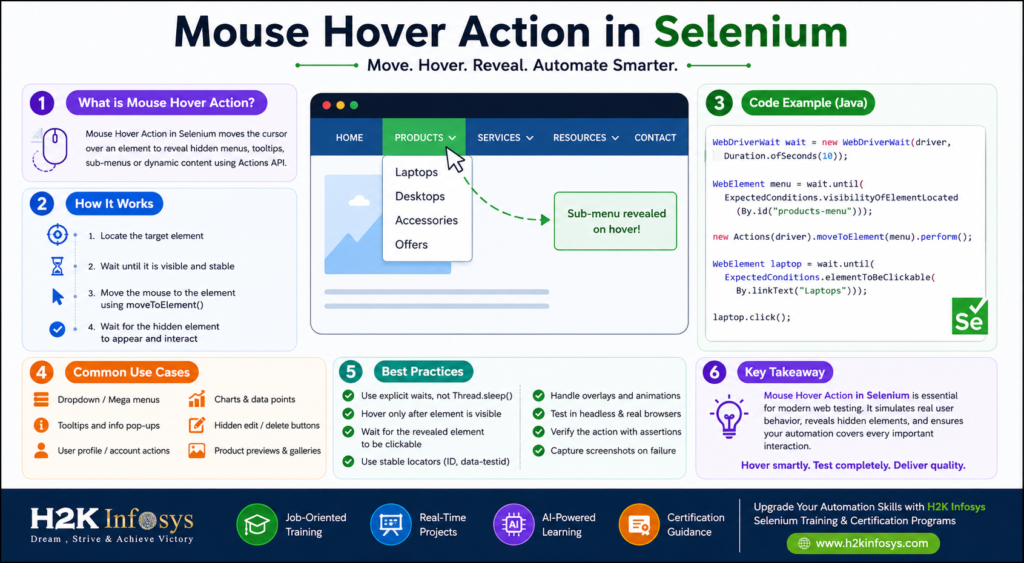
Hover testing looks small, yet it catches failures that basic Selenium testing misses. Modern applications hide account menus, product previews, chart values, help text, and dashboard controls behind hover states.
I learned this the annoying way. A product test opened the page, then failed while selecting “Laptops” under “Electronics.” The locator was right and the page had loaded. The parent menu simply had never received a hover event.
This hover technique is especially useful in these scenarios:
- Retail subcategories appear under a main menu.
- Banking actions appear when a transaction row is hovered.
- Tooltips reveal validation or accessibility details.
- Charts expose exact values under the pointer.
- Edit or download controls appear only on hover.
These are not edge cases anymore. They are routine interaction patterns, which is why good Selenium software testing should cover them.
One practical caution: hover is primarily a pointer interaction. On touch-first layouts, the same menu may open with a tap or use a completely different navigation pattern. Test the behavior your users actually receive at each breakpoint instead of forcing a desktop interaction into every mobile scenario.
How Mouse Hover Action in Selenium Works
WebDriver offers high-level commands such as click, type, clear, submit, and select. Hovering needs finer control, so Selenium handles it through the Actions API, which supports pointer, keyboard, and wheel inputs.
In Java, the basic flow is straightforward:
WebElement menu = driver.findElement(By.id("products"));

Actions actions = new Actions(driver);
actions.moveToElement(menu).perform();
The easy-to-miss detail is perform(). Building the action does not execute it; perform() sends the sequence to the browser. Yes, forgetting one method can waste twenty minutes.
A Mouse Hover Action in Selenium usually follows four steps:
- Locate the element that receives the hover.
- Wait until it is visible and stable.
- Move the pointer to it with
moveToElement(). - Wait for the newly displayed element before clicking or validating it.
The wait matters because menus may animate, fetch data, or appear after a JavaScript delay. Fixed sleeps can hide timing issues while making the suite slower and flakier.
Java Example: Hover Over a Menu and Click a Submenu
Here is a practical Mouse Hover Action in Selenium example using an explicit wait:
WebDriverWait wait = new WebDriverWait(
    driver,
    Duration.ofSeconds(10)
);

WebElement servicesMenu = wait.until(
    ExpectedConditions.visibilityOfElementLocated(
        By.id("services-menu")
    )
);

new Actions(driver)
    .moveToElement(servicesMenu)
    .perform();

WebElement automationTesting = wait.until(
    ExpectedConditions.elementToBeClickable(
        By.cssSelector(
            "a[href='/automation-testing']"
        )
    )
);

automationTesting.click();
This is safer than locating both elements immediately. The submenu may be hidden through CSS or created only after hovering. Waiting for clickability checks the state the next step actually needs.
In day-to-day Selenium Test Automation, add an assertion after the click. A click without verification is just motion; a test should confirm the expected URL, page title, or content.
Python Example for Mouse Hover Action in Selenium
The same idea in Python looks like this:
from selenium.webdriver import ActionChains
from selenium.webdriver.common.by import By
from selenium.webdriver.support.ui import WebDriverWait
from selenium.webdriver.support import expected_conditions as EC

wait = WebDriverWait(driver, 10)

profile_menu = wait.until(
    EC.visibility_of_element_located(
        (By.ID, "profile-menu")
    )
)

ActionChains(driver) \
    .move_to_element(profile_menu) \
    .perform()

logout_link = wait.until(
    EC.element_to_be_clickable(
        (By.LINK_TEXT, "Logout")
    )
)

logout_link.click()
A Mouse Hover Action in Selenium is not language-specific. Java, Python, C#, JavaScript, and Ruby expose comparable action-building concepts. Selenium 4.46, released July 11, 2026, supports those bindings and Selenium Grid.
Using Offsets for Precise Hovering
Center-point hovering is not enough for a heat map, slider, canvas, or chart where different coordinates reveal different values. Use an offset.
new Actions(driver)
    .moveToElement(chart, 120, 40)
    .perform();
The API measures this offset from the element’s in-view center. Moving beyond the viewport can raise MoveTargetOutOfBoundsException.
Keep the browser size consistent for coordinate-based tests. Responsive layouts, zoom, sticky headers, and display scaling can shift the target.
Common Problems with Mouse Hover Action in Selenium
The code is short. The failures are not always short.
1. The element is covered
Cookie banners, chat widgets, sticky headers, and loading overlays can intercept the pointer. Check a failure screenshot before blaming the locator.
2. The submenu disappears too quickly
A tiny gap between parent and child menus can collapse the submenu. Build one chained sequence:
new Actions(driver)
    .moveToElement(parentMenu)
    .moveToElement(childMenu)
    .click()
    .perform();
A chained action can preserve the intended pointer path better than separate commands.
3. The element becomes stale
React and similar frameworks may re-render the menu after hovering. Re-locate the submenu afterward instead of caching an old WebElement.
4. Headless execution behaves differently
Headless rendering can differ from a developer laptop. Set an explicit window size and capture screenshots, DOM snapshots, and console logs on failure.
5. JavaScript is used as the first workaround
A synthetic JavaScript mouseover can help diagnose an issue, but it should not be the default. A real Mouse Hover Action in Selenium is closer to genuine user input.
Building a Stable Mouse Hover Action in Selenium Test
Stable hover tests depend on synchronization and observability. My usual checklist is:
- Prefer
WebDriverWaitoverThread.sleep(). - Wait for the parent to be visible before hovering.
- Wait for the child to be clickable after hovering.
- Use stable IDs, test attributes, or meaningful CSS selectors.
- Capture a screenshot when the hover step fails.
- Verify the resulting navigation, tooltip, or state change.
- Test at the viewport sizes your users actually use.
For a Mouse Hover Action in Selenium, do not locate dynamic descendants too early. Modern interfaces replace nodes as state changes, so locate them when needed and reduce stale-element noise.
Mouse Hover Action in Selenium and Today’s Browser Release Pace
Browser automation now operates at a faster release pace. Selenium’s 2026 discussion noted Chrome’s move toward a 14-day cadence and called it largely manageable for Selenium users. Even so, rendering, event timing, viewport calculations, and compatibility still deserve attention.
A sensible Mouse Hover Action in Selenium strategy includes regular Chrome, Edge, and Firefox runs. After upgrades, run focused smoke tests for menus, tooltips, drag-and-drop areas, and other pointer-driven components.
This is where structured Selenium training helps. Reading a method signature is easy; diagnosing overlays, stale elements, animation timing, and Grid-only failures takes practice.
Learning Mouse Hover Action in Selenium with H2K Infosys
H2K Infosys describes its Selenium Automation with Java + Gen AI course as job-oriented training with real-time project exposure, AI-assisted optimization, smart maintenance, and automated defect analysis. That practical angle matters because a Mouse Hover Action in Selenium rarely fails for one reason.
A useful lab should go beyond making a dropdown appear. Test a delayed menu, nested submenu, overlay collision, stale element, and headless CI run. That is the difference between memorizing syntax and becoming dependable in Selenium software testing.
For professionals preparing for Selenium certification, this topic connects locators, waits, action chains, assertions, cross-browser execution, debugging, and framework design. H2K Infosys suits learners seeking Selenium training that connects commands to realistic project workflows.
Best Practices Checklist
Before you finalize a Mouse Hover Action in Selenium, check these points:
- Is the target visible before the pointer moves?
- Does the hidden element become clickable, not merely present?
- Is the locator stable across responsive layouts?
- Could an overlay intercept the action?
- Does the test verify a meaningful outcome?
- Does it pass in headless mode and on the Grid?
- Have you captured enough evidence to debug a failure?
A reliable hover test should behave like a short user journey, not a single API call. Hover, observe, interact, and verify.
Final Thoughts
The Mouse Hover Action in Selenium is a small technique with a large testing impact. It validates menus, tooltips, previews, charts, and hidden controls. Dependable execution needs explicit waits, stable locators, useful assertions, and awareness of browser rendering.
Start with moveToElement(), wait for the revealed element, and verify the business outcome. For complex interfaces, chain actions, use offsets carefully, and collect failure evidence. That turns a fragile script into maintainable Selenium testing.
For guided, job-oriented practice, H2K Infosys offers project-based Selenium training and certification preparation. A well-designed Mouse Hover Action in Selenium exercise shows whether you understand automation as a system, not merely a collection of commands.